Intro
In the past building, a desktop app required you to learn a completely different tech stack. However, if you're a GoLang enthusiast, then you're in luck. In the many frameworks written, there's Wails v2. Which has been designed to let users stick with GoLang and their JavaScript (JS) framework choice to build a fully cross-platform desktop application.
Wails works similarly to Electron if you're familiar with it. If not, here's the gist: you can build a desktop app without learning anything other than JS, HTML, and CSS.
However, Wails has the added advantage of requiring less computer memory to run and a smaller final file size-- thanks to GoLang. GoLang is the Backend language for processing, and JS is used to pass the data.
I first encountered Wails v1 in a hackathon. I had a lot of fun building a DevOps GitHub Admin Desktop App for doing things such as bulk user removal, bulk branch protections, and more. The project was taking an existing CLI and giving it a GUI. Much like what we will be doing in this article with FreeResumeScanner.com, a single-page web application powered by a lambda for the backend,which is sort of like a CLI.
However, today I will be using Wails v2, which only recently has been released, so it's partly to explore the changes between v1 and v2.
TL;DR
Final Project Source Code
I. Installing Wails 2.0
For those coding along on MacOS
Make sure you have Xcode command line tools Xcode-select --installI.a Now go install wails cli
go install github.com/wailsapp/wails/v2/cmd/wails@latest
I.b Check that wails cli is working
Run wails doctor, which should output the following if everything went smoothly.
Wails CLI v2.0.0-rc.1.1

Scanning system - Please wait (this may take a long time)...Done.

System
------
OS:             MacOS
Version:        12.4
ID:             21F79
Go Version:     go1.19.1
Platform:       darwin
Architecture:   arm64

Wails
------
Version:        v2.0.0-rc.1.1

Dependency                      Package Name    Status          Version
----------                      ------------    ------          -------
xcode command line tools        N/A             Installed       2395
npm                             N/A             Installed       8.4.0
*upx                            N/A             Available
*nsis                           N/A             Available

* - Optional Dependency

Diagnosis
---------
Your system is ready for Wails development!
Optional package(s) installation details:
  - upx : Available at https://upx.github.io/
  - nsis : Available at https://nsis.sourceforge.io/Download


If Wails is useful to you or your company, please consider sponsoring the project:
https://github.com/sponsors/leaanthony
Alright, we've made it to our first break. Congrats on getting Wails working on your Operating System of choice. Go have a walking break or a snack.
II. Generating FreeResumeScannerDesktop project
- Source Code: Free Resume Scanner Desktop
I am choosing to use Svelte for this project because I find it a simple and relatively light programming language. The basic paradigm of Svelte is that it compiles plain vanilla JS, and then the code calls it as needed. This helps reduce the final project size and keep things simple compared to using React.js for this project. Although React is excellent, once you know it it can take considerable time and effort to get productive. You could also use plain JS, which is also simpler than React.
NB I'd been meaning to try out Svelte for some time, and this seemed like an easy enough project to do so with.
II.a Generate Project Layout
Wails has an excellent CLI tool that makes working with the framework a breeze. Here's how easy it is to get started with our Svelte-based project:
wails init -n FreeResumeDesktop -t svelte
Which will lay down this directory structure for the project:
.
├── build/
│   ├── appicon.png
│   ├── darwin/
│   └── windows/
├── frontend/
├── go.mod
├── go.sum
├── main.go
├── app.go
└── wails.json
II.b Testing the plumbing
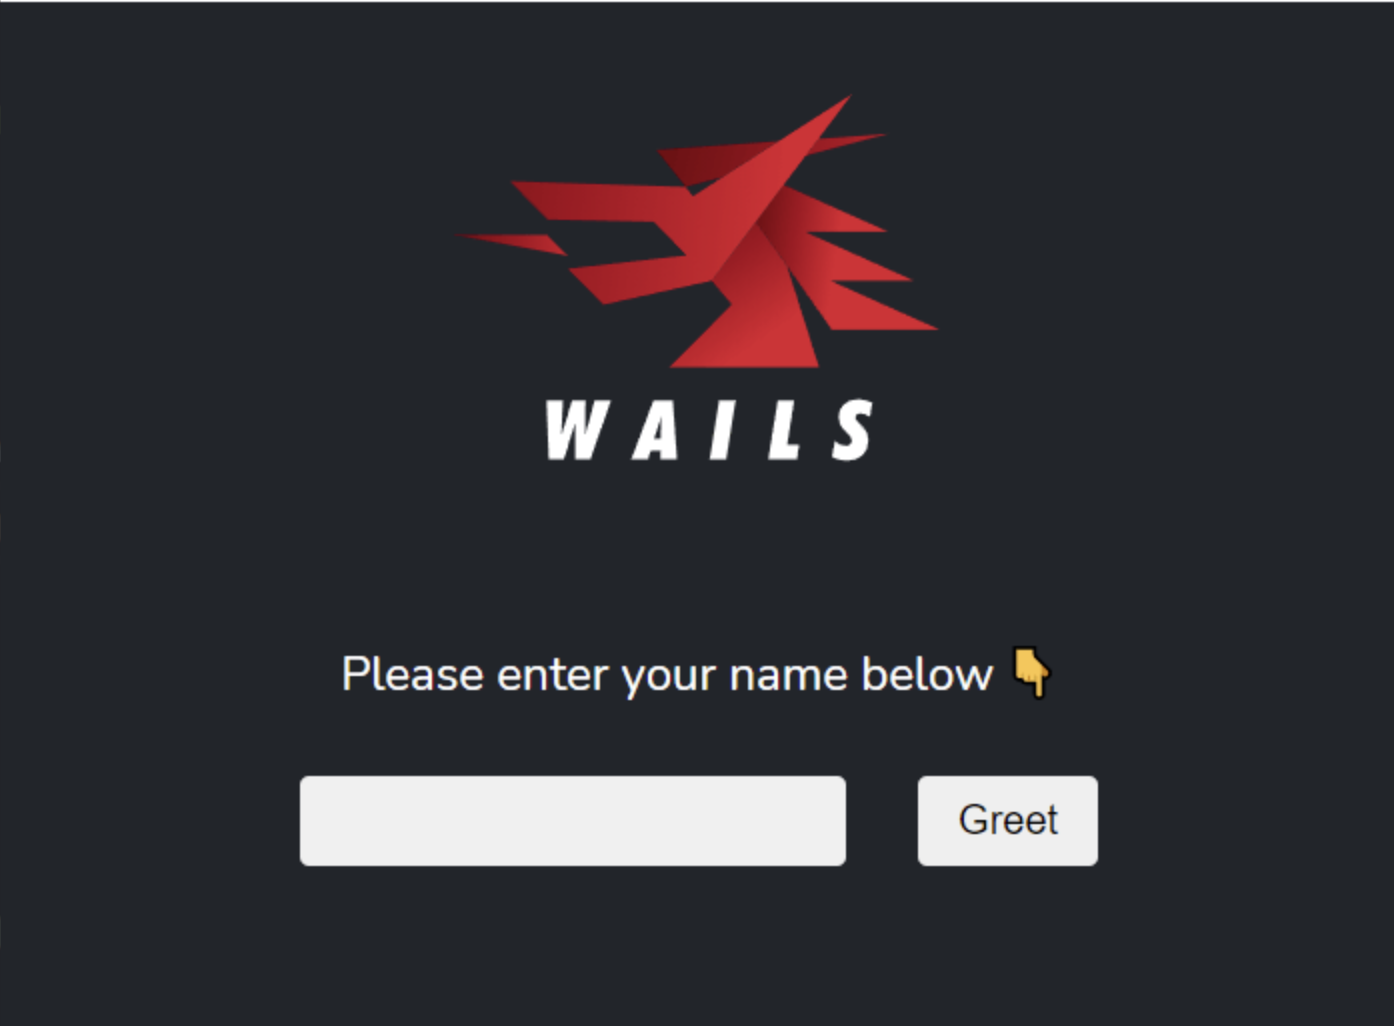
Whenever a project is generated, it will always be the same demo project. So let's test that it works by building the project and then dot slashing the binary.
First, build the binary:wails build
Which will do all the heavy work of gluing together GoLang and JS by converting the code to JS functions that target the GoLang binary. And place the files in their targeted directories. For MacOs, the directory is build/bin/<your-app-name>.app/Contents/MacOs/<your-app-name>
To run it on MacOS type the following:./build/bin/FreeResumeScannerDesktop.app/Contents/MacOS/FreeResumeScannerDesktop
NB if you're using a different OS, then substitute the MacOS for Windows or Linux.
Once the app loads, you should see the following
III. Dev Workflow
Now that the program has been verified to work let's start breaking things-- I mean building.
First, let's use the hot-reload feature, which means that each time a file changes, the code will be rebuilt and served in the browser.
III.a Start dev server
wails dev, the app will build and open a local version and one in a browser.
A convenient feature to save you the time of running wails build & ./.... to rebuild and restart the desktop app.
III.b Frontend
- Start: FreeResumeScannerFrontend
- End:
- Svelte
- App.js
Previously, I shared How to use GoLang, Hugo, and Lambda for a Single Page Application and it contains the elements of the Frontend that is found in Start.
You'll notice that it becomes much simpler thanks to Svelte versus using AJAX and JQUERY. By simpler, I mean fewer lines of code. Less is more, as they say in Linux land.
In general, for this basic app, only two files must be changed in the generated project layout so that the Frontend can talk to the backend.
File 1: App.svelte => UI/UX
The App.svelte file is the one that renders the final user review on the desktop app, and this is where you'll spend most of the time changing things for UI/UX.
<script>
  import logo from './assets/images/logo-universal.png'
  import {ScanResume} from '../wailsjs/go/main/App.js'

  // Change the default to the following
  let resumeLength = ""
  let resumeMeasurables = ""
  let resumeLinkedIn = ""
  let resumeSoftSkills = ""
  let resumeHardSkills = ""
  let resume
  let job

  // Changed the default to the following
  function scan() {
    ScanResume(resume, job).then((result) => {
      resumeLength = result.resume_length;
      resumeMeasurables = result.measurable;
      resumeLinkedIn = result.linked_in;
      resumeSoftSkills= result.soft_skills;
      resumeHardSkills= result.hard_skills;
    })
  }
</script>

<main>
  <img alt="Wails logo" id="logo" src="{logo}">
  <div class="container">
    <div class="input-box" id="input1">
      <input autocomplete="off" bind:value={resume} class="input" id="resume" type="text" placeholder="Paste Resume Here"/>
    </div>
    <div class="table-responsive">
      <table class="table">
        <thead>
        <tr>
          <th scope="col">Metric</th>
          <th scope="col">Value</th>
          <th scope="col">Suggestion</th>
        </tr>
        </thead>
        <tbody>
        <tr>
          <td>Measurable</td>
          <td id="resume-measurable">{resumeMeasurables}</td>
          <td><a href="https://freeresumescanner.com/blog/2022/make-your-resume-pop-with-measurable-bullet-points">Make your Resume Pop with Measurable Bullet Points </a></td>
        </tr>
        <tr>
          <td>Missing Keywords</td>
          <td id="job-description-skills">{resumeHardSkills} , {resumeSoftSkills}</td>
          <td><a href="https://freeresumescanner.com/blog/2022/get-into-a-recruiters-inbox-with-keywords">Get into a Recruiters Inbox with Keywords</a></td>
        </tr>
        <tr>
          <td>Resume Length</td>
          <td id="resume-length-result">{resumeLength}</td>
          <td><a href="https://freeresumescanner.com/blog/2022/dont-get-auto-rejected-keep-your-resume-between-500-1000-words">Don't get auto-rejected keep your Resume between 500-1000 words </a></td>
        </tr>
        <tr>
          <td>Has LinkedIn</td>
          <td id="resume-has-linkedin-result">{resumeLinkedIn}</td>
          <td><a href="https://freeresumescanner.com/blog/2022/use-linkedin-so-that-recruiters-can-dm-you">Use LinkedIn so that Recruiters can DM you</a></td>
        </tr>
        </tbody>
      </table>
    </div>

    <div class="input-box" id="input2">
      <input autocomplete="off" bind:value={job} class="input" id="job" type="text" placeholder="Paste Job Description Here"/>
    </div>
  </div>

  <button class="btn" on:click={scan}>Scan Resume</button>


</main>

<style>

  #logo {
    display: block;
    width: 30%;
    height: 30%;
    margin: auto;
    padding: 10% 0 0;
    background-position: center;
    background-repeat: no-repeat;
    background-size: 100% 100%;
    background-origin: content-box;
  }

  div.container{
    display: flex;
    flex-wrap: nowrap;
  }

  table, th, td {
    margin-top: 10px;
    border: 1px solid black;
    border-collapse: collapse;
    background-color: antiquewhite;
    flex: 40%;
    color: black;
  }
  .input-box {
    margin: 10px;
    padding: 10px;
    flex: 40%;

  }

  .btn {
    width: 70%;
    height: 30px;
    line-height: 30px;
    border-radius: 3px;
    border: none;
    margin: 0 0 0 20px;
    padding: 0 8px;
    cursor: pointer;
  }

  .input-box .btn:hover {
    background-image: linear-gradient(to top, #cfd9df 0%, #e2ebf0 100%);
    color: #333333;
  }

  .input-box .input {
    border: none;
    border-radius: 3px;
    outline: none;
    height: 200px;
    line-height: 30px;
    padding: 0 10px;
    background-color: rgba(240, 240, 240, 1);
    -webkit-font-smoothing: antialiased;
  }

  .input-box .input:hover {
    border: none;
    background-color: rgba(255, 255, 255, 1);
  }

  .input-box .input:focus {
    border: none;
    background-color: rgba(255, 255, 255, 1);
  }

</style>
File 2: App.js => Plumbing
As mentioned earlier, Wails does all the heavy lifting of binding GoLang code to JavaScript. This file contains the directions for what JavaScript should pass to the GoLang binary.
// @ts-check
// Cynhyrchwyd y ffeil hon yn awtomatig. PEIDIWCH Â MODIWL
// This file is automatically generated. DO NOT EDIT

export function ScanResume(arg1, arg2) {
  // changed the name of the func and the number of arguments expected
  return window['go']['main']['App']['ScanResume'](arg1, arg2);
}
All we need to do here is tell it (1) What the GoLang function name is and (2) how many arguments it expects.
Now that the Front-end changes have been made, let's hook up the backend.
Whoot second break time. We're almost there. It's probably time for a coffee break if you're going through this in one sitting.
IV. Backend
As I mentioned, I shared How to use GoLang, Hugo, and Lambda for a Single Page Application and the Backend Code that powers the Frontend.
In that article, it was an AWS Lambda. This one is essentially the same, except we get the benefit of Deleting all of the AWS Lambda dependencies and code.

Anytime you can reduce the codebase size is a good time so let's do so.
package main

import (
	"context"
	"fmt"
	"regexp"
	"sort"
	"strings"
)

// App struct
type App struct {
	ctx context.Context
}

// var (...) is omitted to keep the code snippet short...

// Analyze contains the algorithm for performing the critique
func Analyze(r, d string) (*Result, error) {
	resu := strings.ToLower(r)
	desc := strings.ToLower(d)

	linkedIn := HasWord(resu, "linkedin")
	rLength := ResumeLength(resu)

	// Collect keywords from Job description
	JobDescrHardSkills := Find(desc, Hard)
	JobDescrSoftSkills := Find(desc, Soft)

	// Collect keywords from resume
	ResumeHardSkills := Find(resu, Hard)
	ResumeSoftSkills := Find(resu, Soft)

	// If Resume does not have hard skills that were found in the job description
	// then add the Result as recommendation
	hSkills := Diff(JobDescrHardSkills, ResumeHardSkills)

	// If Resume does not have soft skills that were found in the job description
	// then add the result as recommendation
	sSkills := Diff(JobDescrSoftSkills, ResumeSoftSkills)

	mSkillCount := MeasurableSkillCount(resu)

	res := &Result{
		LinkedIn:     linkedIn,
		HardSkills:   hSkills,
		SoftSkills:   sSkills,
		ResumeLength: rLength,
		Measurable:   mSkillCount,
	}
	return res, nil
}

func Find(t string, set []string) (skills []string) {
	for _, s := range set {
		s = strings.ToLower(s)
		t = strings.ToLower(t)
		if strings.Contains(t, s) {
			skills = append(skills, s)
		}
	}
	return RemoveDups(skills)
}

func HasWord(t, h string) bool {
	return strings.Contains(t, h)
}

// Diff returns the elements in `a' that aren't in `b`.
func Diff(a, b []string) []string {
	a = SortIfNeeded(a)
	a = RemoveDups(a)
	b = SortIfNeeded(b)
	b = RemoveDups(b)
	mb := make(map[string]struct{}, len(b))
	for _, x := range b {
		mb[x] = struct{}{}
	}
	var diff []string
	for _, x := range a {
		if _, found := mb[x]; !found {
			diff = append(diff, x)
		}
	}
	return diff
}

func SortIfNeeded(a []string) []string {
	if sort.StringsAreSorted(a) {
		return a
	}
	s := append(a[:0:0], a...)
	sort.Strings(s)
	return s
}

func RemoveDups(elements []string) (nodups []string) {
	encountered := make(map[string]bool)
	for _, element := range elements {
		if !encountered[element] {
			nodups = append(nodups, element)
			encountered[element] = true
		}
	}
	return
}

// ResumeLength should be between 400 and 1000 words
func ResumeLength(res string) float64 {
	return float64(len(strings.Split(res, " ")))
}

func MeasurableSkillCount(t string) float64 {
	re := regexp.MustCompile(`[\$ ]+?(\d+([,\.\d]+)?)`)
	nums := re.FindAllString(t, -1)
	return float64(len(nums))
}

// Result is the conclusion of the analysis
type Result struct {
	LinkedIn     bool     `json:"linked_in"`
	ResumeLength float64  `json:"resume_length"`
	Measurable   float64  `json:"measurable"`
	HardSkills   []string `json:"hard_skills"`
	SoftSkills   []string `json:"soft_skills"`
}

// NewApp creates a new App application struct
func NewApp() *App {
	return &App{}
}

// startup is called when the app starts. The context is saved
// so we can call the runtime methods
func (a *App) startup(ctx context.Context) {
	a.ctx = ctx
}

// ScanResume analyzes the resume against the job description
func (a *App) ScanResume(resume, jobDescription string) *Result {
	res, err := Analyze(resume, jobDescription)
	if err != nil {
		fmt.Printf("err: ", err)
	}
	return res

}
Woah, and just like that, we've added the backend code necessary to make FreeResumeScannerDesktop run locally. A pretty neat thing to add to one's resume.

It's not the prettiest desktop app, but it works. If you wanna make changes, then feel free to open a pull request and shine up that UI/UX. Getting, Pull Request merges approved and accepted is also a good thing to show recruiters; sometimes, if they're like me, they check the GitHub link on the resume.
Conclusion
Wails v2 makes building cross-platform desktop apps much more manageable than Wails v1, and this is because, first, the documentation has improved dramatically, in my opinion. Second, the wails-cli has gotten even better. It is easy to generate the file structure in several different javascript frameworks and one language ;).
I hope this article has been helpful to you and helps you with learning GoLang!